
Do This Now
- 1 Set the attack to 10ms or 30ms. Anything under 1ms clamps the kick and snare transient and flattens the whole mix.
- 2 Aim for 1dB to 2dB of gain reduction on the loudest peaks. A needle pinned at 4dB is tracking compression, not glue.
- 3 Keep the ratio at 2:1. Go to 4:1 only for aggressive rock, and never past it.
- 4 High-pass the sidechain at 100Hz so the kick stops dipping the cymbals and vocals on every hit.
- 5 Patch the compressor in before you start mixing and mix into it. Adding it at the end rebalances every fader you set.
Playing connects you to YouTube, which may set cookies.
Adding compression to the master bus is standard practice in modern audio production. It is referred to as "mix glue." This process glues disparate tracks together by narrowing the dynamic range of the entire arrangement collectively. Misunderstanding it will destroy a vibrant mix instantly by crushing transients and inducing pumping.
Master bus compression must be subtle. The goal is not loudness. The goal is cohesion. You will learn the technical differences between VCA and Vari-Mu topologies on the 2-bus, and the specific parameter settings required to preserve the punch of a kick drum while reining in a lead vocal.
Topologies on the Master Bus
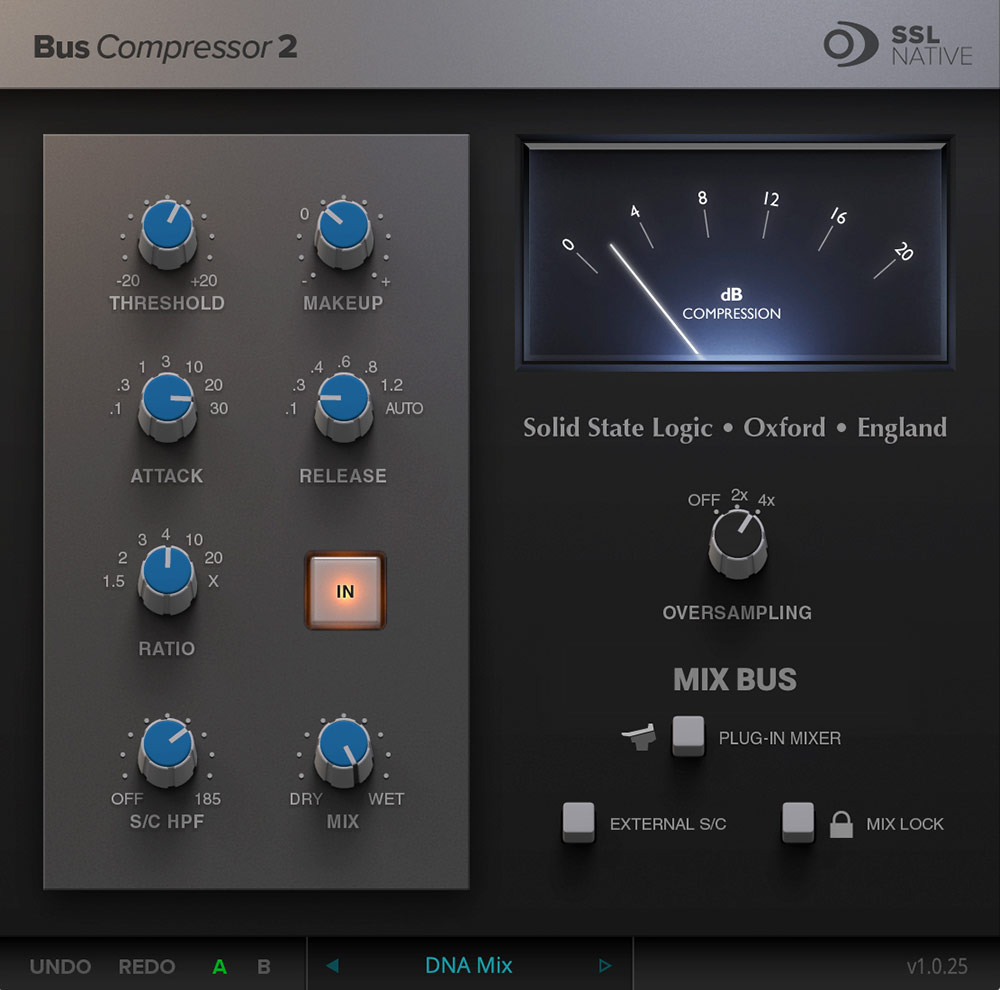
Not all compressors belong on the master bus. Solid-state VCA (Voltage Controlled Amplifier) compressors are the industry standard for this application. The SSL G-Master Buss Compressor is the archetypal example. VCA units are fast, snappy, and transparent. They clamp down on transients predictably, making them perfect for rhythmic, transient-heavy genres like pop and rock.
Variable-Mu (Vari-Mu) compressors rely on vacuum tubes to achieve gain reduction. The Fairchild 670 or Manley Nu Mu are classic examples. Vari-Mu units are intrinsically slow. They cannot catch fast transients. Instead, they provide a thick, leveling effect that warms the entire track. Use Vari-Mu topologies for jazz, orchestral music, or ballads where gentle leveling is preferred over aggressive snap.
Avoid FET and Optical compressors on the master bus. FET units are aggressively fast and introduce severe distortion, choking the mix. Optical units have a non-linear, program-dependent release that makes the low end unpredictable and muddy on complex material. The friction point with choosing a topology is CPU load. Premium VCA emulations with oversampling will tax older mixing templates.
The Sacred Art of Attack and Release
The most critical parameters are attack and release. Setting the attack too fast on the master bus is the single most destructive mistake a mixing engineer can make. A fast attack (under 1 millisecond) clamps down instantly on the initial spike of the kick and snare. This completely neuters the punch of the drum kit, resulting in a flat, lifeless mix.
Set the attack to 10 milliseconds or 30 milliseconds. This is known as a slow attack. It allows the initial transient of the percussion to pass untouched before the compressor engages to clamp down on the sustain. The kick drum still hits hard, but the snare tail and cymbals are glued to it.
The release time controls the groove. A fast release causes the compressor to let go instantly, creating a pumping effect. This is popular in French house music but fatiguing elsewhere. A slow release clamps down on the first beat and never fully recovers, burying the mix dynamically. The solution is the "Auto" release setting found on SSL-style VCA compressors.
Auto release functions as a dual-stage circuit. It recovers quickly from short transient peaks but releases slowly for sustained bass notes. This prevents pumping while keeping the average level high. If your mix feels choked and small, slow down your attack time.
- Attack
- 10ms or 30ms
- Release
- Auto on SSL-style units
- Never
- Attack under 1ms
- Choked mix means
- Attack is too fast
High-Pass Filtering the Sidechain
Sub-bass energy contains massive amplitude. A kick drum centered at 50Hz simply takes up more headroom than a hi-hat at 10kHz. If you run a mix through a standard compressor, the extreme low-end energy will trigger the gain reduction circuit constantly. The kick drum will cause the cymbals and vocals to dip in volume every time it hits. This is broadband pumping.
Most modern master bus compressor plugins include a sidechain high-pass filter (HPF). This is not an EQ cut on the audio path. It is a filter placed on the internal detection circuit that the compressor uses to determine when to engage.
Engage the HPF and set the cutoff frequency to 100Hz. The compressor will now ignore the sub-bass energy when calculating gain reduction. The kick drum passes through largely uncompressed, while the snare drum, guitars, and vocals trigger the glue compression appropriately. The friction point is masking. If the bass is untouched while the mids are compressed, the bass will appear much louder in the final mix, requiring re-balancing.
Gain Reduction Ranges and Ratio
Keep the ratio extremely low. A 2:1 ratio is standard for master bus compression. It provides gentle containment without hard limiting. A 4:1 ratio is viable for aggressive rock mixes if the threshold is set high. Never exceed 4:1 on the master bus unless you are explicitly trying to destroy the dynamic range for creative effect.
Aim for a maximum of 1dB to 2dB of gain reduction on the loudest peaks. If the needle is constantly pinning at -4dB, you are applying tracking compression, not mix glue. The needle should just "tickle" the peaks on the snare hits.
- Ratio
- 2:1 standard
- Ratio ceiling
- 4:1 for aggressive rock
- Gain reduction
- 1-2dB on peaks
- Meter behaviour
- Tickle, never pin
Configure your master bus chain before you start mixing. Mix into the compressor from step one. If you get a great static mix and blindly slap a VCA compressor on the master fader at the end, it will change the balance of all your faders.
Related Articles

Best Bus Compressors (2026): The 'Glue'
Stick your mix together. We review the legendary SSL and API bus compressor emulations that give your track that finished 'record' sound.
The 6 Best Mastering Plugins, Stage by Stage (2026)
Six mastering plugins scored on sound, speed, CPU and metering: FabFilter's Mastering Bundle, Elevate, UA's SSL G bus compressor, the M5133 EQ and more.
Frequently Asked Questions
How much gain reduction should master bus compression apply?
One to three decibels on peaks, and no more, if you want glue rather than an effect. Beyond about 4 dB the compressor becomes an audible part of the arrangement, which is a choice rather than a mix stage.
What attack and release times work for bus glue?
A slow attack around 30 ms lets transients through so the mix keeps its punch, and a release timed to the tempo lets the level recover between phrases. Auto-release is a reasonable default on program material because it tracks changes in density better than a fixed setting.
Should I high-pass the compressor sidechain?
Usually yes, around 80 to 120 Hz. Without it the kick and the sub drive the whole gain reduction, so the entire mix ducks on every low hit. Filtering the sidechain leaves the low end audible while stopping it from controlling everything else.
Is bus compression the same as limiting?
No. Bus compression shapes the relationship between elements at low ratios; limiting stops peaks exceeding a ceiling at very high ratios. Using a limiter for glue flattens the mix, and using a compressor for peak control lets peaks through.
More Guides
All Guides →How Loud Should a Cue Be? The Spec Nobody Sends You
Music for picture is not mastered to a streaming target. What -23 and -24 LUFS actually mean for a composer, why your cue sits under dialogue, and what to deliver when nobody specifies.
Why Your Cue Falls Apart the Second the Director Plays It on a Laptop
A laptop speaker rolls off below 400Hz, so everything holding your cue together vanishes. What survives, what to check before you send, and the one reference that catches it.
Mastering Cinematic Percussion: Programming Massive Rhythmic Beds
Techniques for layering Taikos, sub-booms, and ticking clocks to create modern trailer and film percussion tracks without destructive clipping.
New reviews, no noise
Occasional email when we publish something worth your time. No daily digest, no vendor press releases.
We store only your address, never sell it, and delete it as soon as you unsubscribe. See our privacy policy.

Henry Foster
Henry is a mixing engineer with a background in broadcast and post-production. He obsesses over signal flow, gain staging, and the subtle coloration of analog-modeled plugins. His reviews focus on technical precision, CPU efficiency, and UI workflow.